Today was one of those bad food-blogger days where you wake up with absolutely no idea what you're going to post.
Generally, what I do requires a lot of preparation. Planning, shopping and prep work, all taken care of on the weekends. Then I can assemble, finish or bake during the week quickly and with minimal effort. It tends to work well.
Well the key words here are "tends to".
Sometimes though, things don't go according to plan... recipes turn out to be a little "meh" or worse "bleh". Occasionally I will get all persnickety over the visual appearance of an otherwise fine dessert. Like my creme caramel: "they would look more impressive if they were baked in a smaller ramekin and were taller". My baking OCD can work against me in times like this and I end up refusing to post it.
Things like the above end up leaving holes in my schedule, holes I feel compelled to fill with something...
So before I've even showered or had breakfast, I start digging around in cookbooks looking for inspiration. (See how glamorous the life of a food blogger is?) I was leaning towards a cake today because I was hungry and two of the blogs I follow posted some seriously nom-worthy cakes recently (Chocolate Overload and the Magnolia Bakery Vanilla Cake ). These are not things you want to look at or think about before breakfast. They can make you do impulsive things...
Like bake a layer cake on a Thursday morning.
Luckily, this cake wasn't too fussy--well relatively, we are talking about a layer cake here--and it came together quickly and easily. Layers of raspberry preserves and lemon buttercream decorated simply with a little coconut. No piping tips needed.
The one thing I hate about layer cakes is cutting them. It always squishes the back of the cake a bit, making my once perfect layers look messy. Bah! Yes, that is my food-blogger/baker OCD talking.
When frosting this cake I had to go back and make another half batch of buttercream to get the coverage I wanted for the four 8" layers. So if you're a frosting fiend like myself, or baking in 9" pans, plan ahead and make extra buttercream. Raspberry Lemon Coconut Cake from Baking 2 1/4 cups (244g) cake flour 1 tablespoon (12g) baking powder 1/2 teaspoon salt 1 1/4 cup (295ml) whole milk or buttermilk, room temperature 4 large egg whites, room temperature 1 1/2 cup (302g) granulated sugar 2 teaspoons fine lemon zest 1 stick (8 tablespoons 113g) unsalted butter, room temperature 1/2 teaspoon pure lemon extract
Lemon Buttercream 1 cup (201g) sugar 4 large egg whites 3 sticks (339g) unsalted butter at room temperature 1/4 cup (59ml) fresh lemon juice 1 teaspoon pure vanilla extract
2/3 cup raspberry preserves (strained for seeds, if desired) 1 1/2 cups sweetened shredded or desiccated coconut (I'm using desiccated for this cake)
Pre-heat your oven to 350°F and place a rack in the lower third of your oven. Coat two 8" or 9" pans with butter or nonstick spray and line the bottoms with a circle of parchment. Place the pans on a baking sheet and set aside.
In a medium bowl, sift together the cake flour, baking powder and salt and set aside.
In a second small bowl, combine the milk and egg whites and set aside.
In the bowl of your stand mixer, combine the sugar and lemon zest and mix for a minute on medium speed until fragrant. Add the butter and cream together on medium speed for 4-5 minutes until the mixture is light and fluffy. Beat in the lemon extract and then grab your bowl of flour and milk.
Reduce the mixer's speed to slow and add 1/3rd of the flour. Once moistened, increase the speed to medium and mix until incorporated. Then add 1/2 the milk mixture and beat until the mixture is uniform. Repeat with the remaining flour and milk, alternating until you've finished with the last 1/3rd of the flour. Mix the batter for a further 2 minutes to ensure it is lump free and well aerated.
Divide the batter between your baking pans (I think it was a bit over 500g for each pan) and bake for 30 to 35 minutes until the centers of the cake springs back when touched lightly.
Place the cakes on wire racks to cool. After a few minutes, run a knife around the outside of the pan to release the cake and remove from the pans. Allow to cool right side up until room temperature.
To make the buttercream:
Combine the sugar and egg whites in a bowl over simmering water. Whisking constantly, beat until the mixture is warm to the touch and the sugar is no longer gritty. Remove from heat and continue to beat until you have a thick, glossy meringue.
Transfer the meringue to the bowl of your stand mixer with the paddle attachment and beat for several minutes on medium speed. Once the bowl of the mixer feels cool to the touch you can add your butter, one stick at a time beating on medium high. Once the butter is all in, continue to beat for 6-10 minutes.
The mixture may seem to curdle at some point but don't worry, continue to beat and it will come together into a velvety buttercream.
Once well beaten, you can add the lemon juice a little at a time, beat until absorbed and then adding more. Then add the vanilla and you're ready to frost.
To assemble the cake:
For a four layer cake, level and divide the layers with a serrated knife. Place the bottom layer onto a cake round (or onto a cake plate with tuck strips of wax paper under the cake to protect the plate while frosting).
Spread a third of the raspberry preserves onto the bottom layer of the cake and then a layer of buttercream. The trick to layering buttercream on top of a slippery layer of preserves is to put your buttercream into a disposable piping bag (or ziplock bag) and cut off a 1/3" diameter opening. Starting in the center of the layer, pipe a coil of buttercream. Continue to coil tightly, round and round until you have an even layer of icing on top. No need to spread the frosting with a spatula using this method. Top with a second layer of cake and repeat two more times. Place the last layer on top and then crumb coat the cake with a thin layer of icing. Chill the cake until the icing is firm and then frost the cake with the remaining butter cream. Smooth the remaining buttercream over the cake with an offset spatula until it is level and smooth.
Sprinkle the coconut over the top of the cake and coat the sides by gently pouring the coconut between your hand and the cake.
The cake is best eaten the day it is made. If you need to store it, refrigerate it covered for up to two days, allowing plenty of time to bring it back to room temperature before serving.
These are for Dimitri, who emailed me requesting an ice cream sandwich recipe.
Today I had eight of these ice cream sandwiches ready to photograph and six of them mysteriously disappeared from my freezer, violating the Humble Household Rule: If you don't see it on the blog then you probably shouldn't eat it without asking.
Oh well. I still have two left and I can hardly blame the hungry thief. They do look and taste quite good.
I love making ice cream sandwiches from scratch. This is one dish I never have to fuss over to make look pretty. They are just naturally gorgeous. I also enjoy how customizable they are. There are nearly endless possibilities for shapes and fillings. I can roll the sandwiches in crushed candy or dip them in chocolate. I can cut the chocolate wafer dough into any shape I like. I could even use my crazy lobster cookie cutter...
A lobster shaped ice cream sandwich would probably be the coolest thing on the planet. (Pun not intended.)
Unfortunately, I was feeling rather conformist when I baked these and chose a fluted biscuit cutter. You will find tall cutters work best--like biscuit cutters--as you'll be using the same cutter to cut your ice cream as you do your cookies.
To keep this simple I decided to omit ice cream recipes from this post, instead giving the wafer cookie recipe and then discuss how to make these using either homemade or store bought ice cream. Yes, that's right no need for special kitchen equipment for these cuties.
The following is my favorite cookie recipe for ice cream sandwiches. They're crisp, rich with chocolate flavor and stay true to shape when baked. Be sure not to substitute plain non-alkalized cocoa for dutched cocoa. For the best color and flavor you need an extra dark dutch processed cocoa powder (sometimes labeled "extra-dutch" rather than extra dark). In the U.S. Hersey's Extra Dark Baking Cocoa is easy to find in most well stocked grocery stores.
Chocolate Sandwich Cookies from Fran's Pure Chocolate yields 3-4 dozen 2.5" cookies 1 1/2 sticks (12 tablespoons) butter, at room temperature 1 cup granulated sugar 2/3 cup extra dark Dutch processed cocoa, sifted 1 large egg 1 1/2 teaspoons pure vanilla extract 1 1/4 cup all purpose flour
extra flour and cocoa for dusting
In your stand mixer with the paddle attachment, cream the butter and sugar on medium-high speed for several minutes until light and fluffy.
Add the cocoa powder, mixing on low speed, scraping down the sides of the bowl occasionally. Then add the vanilla and the egg and blend on medium speed until thoroughly combined.
Add the flour on low speed, mixing until uniform and comes together like a dough.
Remove the cookie dough from the mixer, wrap in plastic and chill until firm (4 hours to overnight). You can store the dough wrapped like this for 2-3 days if you wish to make it in advance.
When ready to bake, pre-heat your oven to 350°F.
Remove your dough from the refrigerator, if it is hard as a rock allow to stand at room temperature for a little while before exercising your rolling muscles on it.
In a small bowl, mix together enough flour and cocoa to dust your cutting board and your dough to keep it from sticking (a mix of 50/50 flour/cocoa). Using cocoa powder to dust will keep the surface of your cookies dark and chocolaty looking.
Roll out your chilled dough to about 1/8" thickness and cut out your shapes. If anyone is curious, I used the largest of the fluted cutters from this set: R & M Biscuit Cutter Set. Arrange the cutouts on parchment paper or silpats, they spread only a little so don't be too concerned about crowding.
Bake for 10 minutes, until the surface is no longer glossy. Allow to cool completely on wire racks. They will be soft fresh out of the oven but will crisp up as they cool.
Once cool, place the cookies in a ziplock baggie or other container and freeze until ready to use.
To make the sandwiches with homemade ice cream:
Line a baking dish (or other flat container with 1.5" sides) with plastic wrap. How large a dish will depend on both how thick you want your sandwiches and the capacity of your ice cream maker. A 9"x9" pan or a 9"x13" pan should work well.
Whip up your desired ice cream flavor, according to your machine's instructions. When ready to chill, pour the ice cream into the bottom of your prepared pan. Spread the ice cream to fill the pan evenly (aim for a thickness between 1/2" or 1 1/4") and then place another sheet of plastic wrap on top, pressing it onto the surface of the ice cream. Chill this in the coldest part of your freezer until very, very firm (ideally 24 hours).
When the ice cream is cold, remove the top layer of plastic and using the same cookie cutter you used for the chocolate wafers, cut out shapes from the ice cream. Working quickly, place the ice cream cutouts between two frozen chocolate cookies and return to the freezer.
If desired, roll the ice cream sandwiches in sprinkles, chopped nuts, crushed candy or any other delicious topping you can think of.
Chill until firm and then they are ready to eat.
To make the sandwiches with store bought ice cream:
The easiest way to do this is to choose an ice cream that comes in a box, one that you can unwrap completely and slice. Cut out the shapes from these ice cream slices in the same way you would the homemade method.
You can also attempt to line a pan with softened store bought ice cream, as you would with the homemade version. However you need to be careful how soft the ice cream gets, or the texture will suffer when it refreezes.
Again, while cutting your ice cream, place each cutout between two frozen chocolate cookies and return to the freezer.
If desired, roll the ice cream sandwiches in sprinkles, chopped nuts, crushed candy or any other delicious topping you can think of.
So occasionally I Google my blog name to see what folks are saying about me and NSHP. Just to make sure no one hates me. I'm a neurotic, socially fragile person, what can I say.
So I was reading the buzz and I noticed a link to an article at Jezebel.com talking about pretty bloggers.
The ones run by beautiful hipsters who take photos of their beautiful lives. Complete with perfect clothes, perfect homes filled with beautiful things. Hanging out eating imported cheese from a country you've never heard of, with their model-thin friends and drinking Chardonnay out of photogenic vintage mason jars.
Later, they all head out to some idyllic pasture to make tussie-mussies from wildflowers (the extra blossoms will be photographed braided into their hair).
The whole idea is that these bloggers make us normal folks feel depressed and guilty. We don't have pretty, picture perfect lives. Most of us don't waltz around in vintage floral sun dresses or spend our days consumed with gluing colorful buttons to our refrigerator.
So yea, I'm reading this article on just these sort of blogger and there, in the comment section, is a mention of NSHP. (A comment I just loved, by the way.)
Okay, I love, love, LOVE Ms. Humble's food blog, but her degree in biological anthropology, smarty pants husband, cute kid, stay-at-home and bake-all-day life, in Seattle makes me oh so jealous. And I'm always left wondering---who's eating all of that beautiful food she's making?
My kid is darn cute, this is true.
Little Humble happily nomming one of my giant botched lollipops
But jealous? Really?
Okay, I so cook pretty-ish things but I never set out to make what I do seem easy or normal. As realistic as I try to keep things, even Ms. Humble isn't 'Ms. Humble' 100% of the time outside of the pages of this blog. Sure, I cook almost constantly, but I'm also no stranger to pizzas and takeout. Occasionally...and I loath to admit this, I've even been known to grab a bag of dubious, cheap tacos at Taco Bell.
(Cringe)
See what I mean? I'm normal.
I don't pretend everything is rainbows and unicorns in my kitchen. I can and do mess up. I don't have a magic wand that turns out perfect food. Nor do I take myself or what I do very seriously. I don't want to fall into the black hole of romanticizing food, where I would ramble on and on about how creme caramel reminds me of afternoons in Paris, or discuss the perfect pairing of romantic rainy Seattle days and piping hot lattes.
Some of my family know about and read this blog. They would torture me if I aspired to write like that. It just isn't me.
I'm your normal 20-something mom. I cook, I eat. I frequently get inspired by a new recipes and if I overindulge, my pants get tight.
Normal.
Perhaps I make what I do look too easy? Is that it?
Well it isn't. Trust me. Food blogging--as many of you probably know--is a lot of work. Cooking with the additional, near constant demands of a toddler requires almost superhuman juggling abilities.
Sure you get to see the pretty results of my baking, but you never see my daughter streaking through the kitchen with her tush hanging out because she has recently discovered how to remove her diaper.
No one sees the stained apron or the stacks of dirty dishes that take an entire day to wash.
No one sees the look of horror that follows collapsing on an ivory sofa--one that I am a masochist for buying--after a long day's work only to remember I've been dusting cocoa powder covered hands on my butt all afternoon.
Anyway, my point is: Don't feel guilty or depressed by the crafty, talented wannabe Martha Stewarts out there. I can only speak for food blogging, but it really isn't as effortless as some, or even I, may make it look.
Since I spent all my time writing the above, I'm just going to say that the following recipe is very yummy. Like eating a truffle with a spoon. Nom.
Chocolate Pots De Créme from Luscious Chocolate Desserts serves four 1 cup heavy cream 4 ounces semisweet or bittersweet chocolate, finely chopped 1/2 teaspoon vanilla extract 3 large egg yolks 1/4 cup light brown sugar, packed pinch salt
Kettle of boiling water
Preheat your oven to 325°F with a rack in the middle of the oven. Ready four 5-ounce ramekins and a 9"x13" baking pan.
Bring the cream to a boil over medium heat. Remove from heat and whisk in the vanilla and chocolate until smooth.
Whisk together the egg yolks, sugar, and salt in a large bowl, making sure to break up any lumps in the brown sugar. Temper the mixture by adding 1/3rd of the hot cream, whisking gently to blend. Add the remaining cream, whisking steadily to combine.
Strain the mixture through a fine sieve and divide between your ramekins.
Place the ramekins into the baking pan and place in the oven. Pour the boiling water in to the pan so that it comes up 1/2 way up the sides of the ramekins.
Bake for 25 minutes, or until the custard is barely set around the edges and still wiggles when shaken in the center. Remove the custards from the water bath and allow to come to room temperature on a wire rack. Once cool, chill for at least 3 hours or up to one day.
Garnish, if desired, with a little lightly sweetened whip cream.
For a little extra reality, I snapped a photo of what it looks like when you step back from the tripod:
What food photography looks like from my POV. Gray cards, scraps of fabric and couple of dishes (now empty because of a hungry photographer).
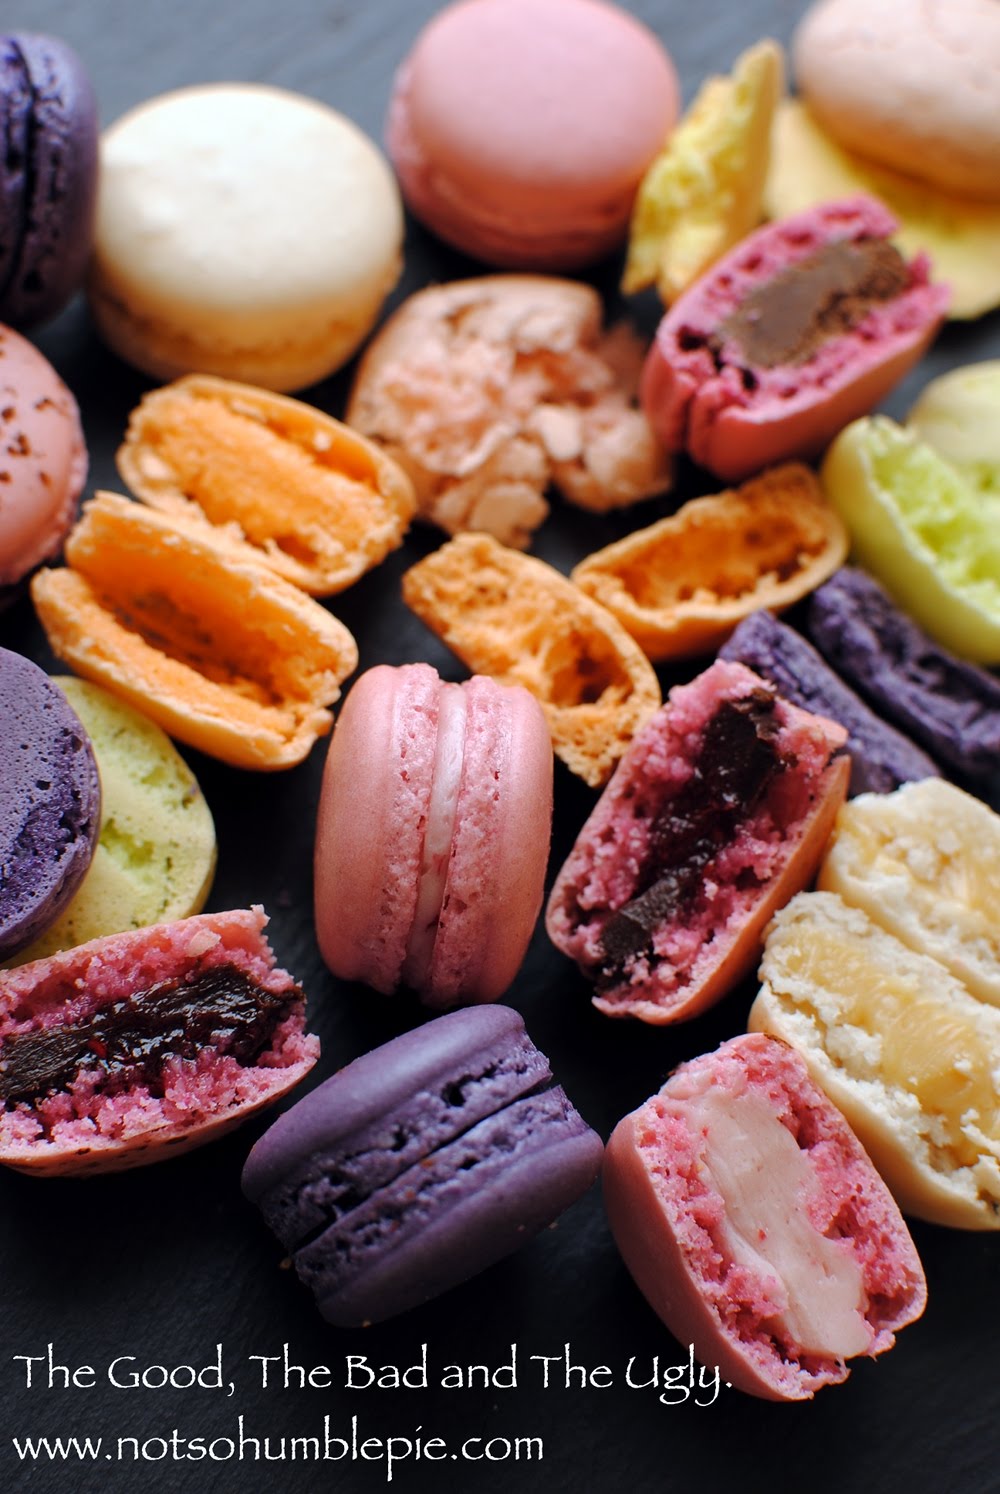
Two months of testing, almost 80 hours in the kitchen baking. Obliterating countless eggs and pounds of almonds and sugar trying to produce not only good macarons but also the maca-wrongs that plague bakers. Testing the limits of how many macarons my family was willing to accept ("Gah! Not MORE macarons!" has been a common utterance around here). That is what it took for me, Ms. Humble: Wannabe Macaron maker, to feel comfortable posting a 101.
Have I mastered everything? No, of course not. Have I learned a thing or two about French Meringue Macs? Absolutely, and hopefully I can provide some hints for folks seeking to master--or at least mildly subdue--these temperamental cookies.
Before I get into that though, let me mention a quick note about emails: I'm wretchedly behind on answering them. I've been doing a tremendous amount of behind the scenes baking. If you've sent me pies for the contest, questions, science goodies, or just general love, and I have not gotten back to you, I'm so sorry. I adore and appreciate every email I get, I've just been swamped for weeks now. I'll try to get caught up on them asap.
Alright with that out of the way, let's rock n' roll.
Macaron 101: French Meringue
Disclaimer: For us non-professionals, macarons are frequently annoying and unreliable.
What may work in my kitchen may not work in yours. There is almost universal agreement that macarons require a very individual approach. This is one of the reasons there is so much variation between recipes for their execution. There are some universals, yes. However, finding what will work in your kitchen, in your ovens, with your ingredients may take a little time.
This quote from the Times kind of sums it up:
Even the professionals struggle with macaroons, says Meike Beck, chief home economist at the Good Housekeeping Institute. “Three seconds of overbeating and they’re ruined.” The institute spent a month making hundreds of batches of macaroons, trying to perfect a recipe. In the end it gave up. “They’re best left to the professionals. Macaroon recipes do work. But they are not consistent.” -- Times Online
Not exactly a confidence booster, is it.
Best left to the professionals though? Nonsense.
Sure macarons can be pesky and frustrating. Making even perfectly lady-like women, such as myself, call them obscene names on occasion, but they're certainly not impossible.
In fact, getting a cookie that is close to ideal isn't all that difficult. Getting the perfect macaron, where every detail is just right, that can be tough. However if a newbie like myself can manage it on occasion, so can you. I'm no trained professional, after all.
So, in setting out to conquer French meringue macs I started by looking for the 'perfect' recipe.
I began by researching what was out there on the web. Looking at what worked and what seemingly didn't. I started gathering recipes, from various cookbooks, ones posted online supposedly used by Laduree and Hermé, recipes from the well known--and not so well known--macaron baking food bloggers. I gathered over a dozen unique, 'successful' recipes for the basic french meringue macaron and I poured over them.
Single recipe, many results. Even small variations in technique can make for big differences in the final cookie.
They all looked different at first impression, each recommending different of amounts for each ingredient. However, when I started reducing them to simple ratios of egg, sugar and almond, I noticed they were actually quite similar...
Let me demonstrate with a bit of scatter plot nerdery:
If this is an unforgivably dorky approach to baking, I apologize but this is how Ms. Humble rolls.
The dots are the ratios of 1 gram of egg to grams of sugar and almond. The amount of almond meal in macarons is pretty consistent across recipes with a few exceptions. Roughly 1.2-1.3g of almonds per 1g of egg white. There is slightly more variation in sugar, with most of the recipes using 2.1-2.5g of sugar per 1g of egg.
Really though, apart from the outliers, most recipes are pretty similar. Which made it amusing when I saw debates over X's macarons vs Y's macarons, knowing that they were nearly identical.
In crafting my own recipe I decided to toss out the radical outliers (like that lousy I Heart Macarons recipe), deciding to focus on the point around which many of the successful recipes clusters. I felt like this was where I would find the 'perfect recipe'. Or at least, the most 'reliable' recipe. I liked the 1.2/2.35 point and I decided it was where I would begin my baking trials. I did messed around with some slight variations on that recipe, +/- a few fractions of a gram for almond/sugar for every gram of egg, but it doesn't result in much difference.
So yes, that is how I chose the recipe. 1.2/2.35 grams almonds/sugar for every gram egg white.
So, based on the scatter plot we see that most macaron recipes are very similar, so why the variation in the results or appearance, right? This comes down to variation in technique. As I mentioned above, macarons are notoriously persnickety when it comes to execution. Of course, the prescribed method is where the recipes start the deviate. The results of this instruction isn't always clear. As I mentioned in the Italian Meringue Macaron 101, you can make beautiful looking macarons that are not great (hollow, hard, dry, chewy etc). So given a set of good french meringue ratios, what do I do to produce good macarons?
This is where I started experimenting.
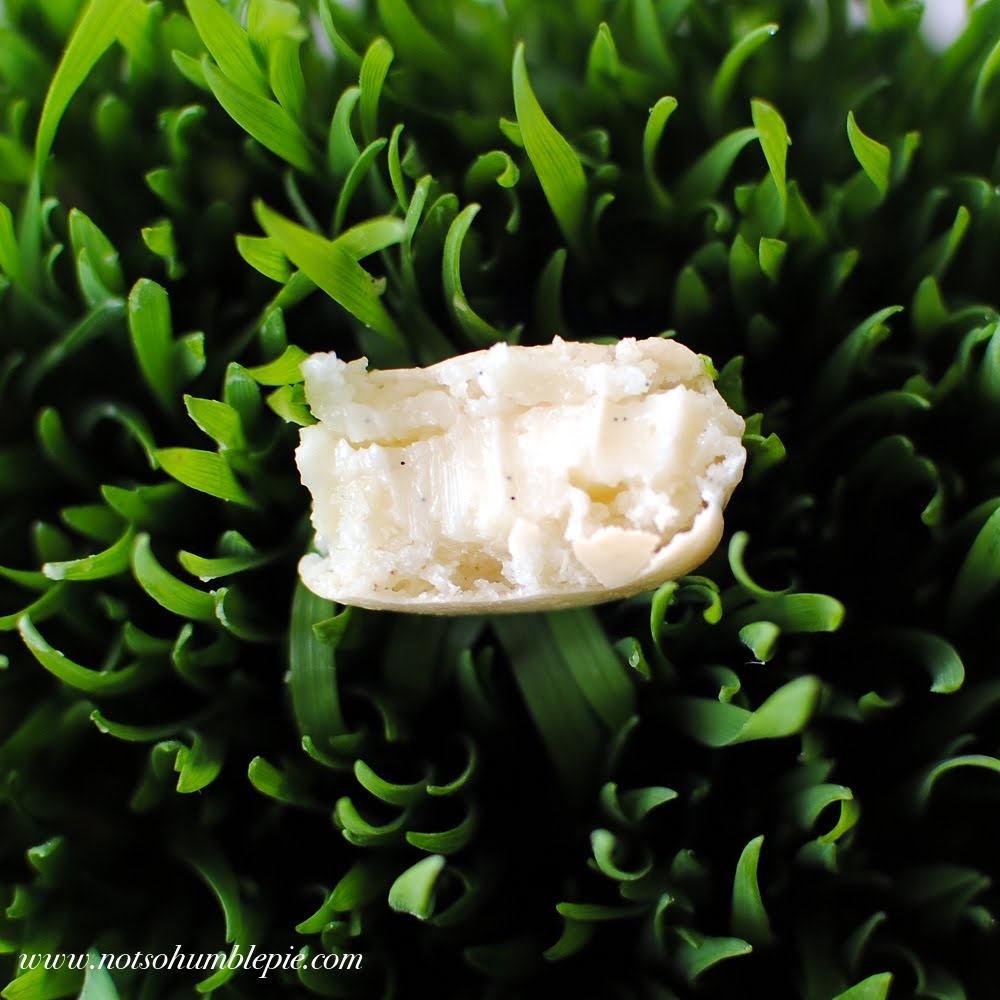
Vanilla bean, vanilla sugar, pure vanilla extract make this delicate Swiss meringue butter cream filled macaron pure bliss.
To keep this from becoming a 10k word post I'm going to limit things to what did work and try to address some of the pitfalls that result in macawrongs along the way.
The French Meringue Method
When I first jumped into macarons several months ago I started with the Italian meringue method, as it is often recommended to beginners as 'more reliable'.
I'm not entirely sure why this is the case. Perhaps it has more leeway when it comes to over/under-mixing. It is difficult to under-mix and even if mixed to death and still makes decent looking cookies (provided one cooks them hot enough) as I demonstrated in the Italian meringue 101. However, French meringue macarons are a little more particular when it comes to mixing.
The upside though is a cookie that is lighter than the Italian meringue, tastier (not as sweet as the cooked sugar method) with a more delicate, cookie-like texture.
Now that I've gotten the hang of french meringue, I prefer it to the Italian. Not only because they are tastier, but because they are simpler. I don't have to worry about boiling small amounts of syrup and whipping up fragile egg whites with molten sugar.
All I need to do is ready my ingredients, beat, combine, allow to rest and then bake.
Do folks have more trouble with french meringue than Italian? It does appear that way. However I think this is because many more bakers attempt the French method. After all, cooking sugar to a specific temperature can be intimidating. Not to mention the idea of combining hot sugar to raw eggs seems like the perfect recipe for candied omelets.
I'm going to come out and say I think the French meringue method is, at its core, easier than Italian. Are beginners really more likely to mess up the French method more than the Italian? Debatable. I think Italian meringue is easier to mix but harder to bake correctly (it is tough to conquer IM's tendency to produce hollow shells or sticky bottoms). I think french meringue is marginally harder to mix correctly (based on the results I see out there in the blogosphere).
Which method should you use? Whichever one gives you results you're happy with.
The Recipe: (For the moment. I'm always experimenting)
(For my latest Macaron recipe and Macaron troubleshooting guide, see this post: LINK) Ms. Humble's Scatter Plot Macarons yields 50 (100 shells) macarons (feel free to divide it for fewer cookies)
120g almond meal
200g powdered sugar
100g egg whites
30-35g granulated sugar
food coloring gel
Line 2-3 heavy gauge aluminum baking sheets with parchment or silicone liners (more on this below). Prep a piping bag with a round tip (I use a Ateco #11 for most of my macs, though I'll occasionally use a #804 for larger macarons). I place the bag into a tall drinking glass (or stout glass) and cuff the bag's opening over the top, this makes the bag easy to fill hands-free.
Weigh out almond meal and powdered sugar and sift together to remove any clumps. (If you own a food processor, I highly recommend blending the ingredients and then sifting.)
Weigh out the egg whites into a large mixing bowl (stainless steel or copper), if you're using stainless feel free to add a pinch of salt, 1/4 teaspoon cream of tartar or couple drops of lemon juice to help strengthen the whites. If you're using copper you need not and should not add any additional acid (more on this below).
Weigh out the granulated sugar. (Often I'll use homemade vanilla sugar for this.)
Begin beating the eggs on low speed. What you're doing here is unraveling the egg white's proteins (these are what will capture the air bubbles you whisk in), they're bundled up and you need to gently unwind them. A light touch does this far better than scrambling them on high speed. Once the egg whites are very foamy, begin sprinkling in the sugar as you beat. Increase the speed to medium, if necessary, and beat the meringue to stiff glossy peaks. (If they start looking grainy, clumpy or dry... uh... you've gone too far.)
Add the food coloring (for the full recipe it usually takes 2-4 drops of gel, for a half batch 1-2 drops does the trick) and mix.
Add about 1/4 of the almond/sugar mixture and fold in until no streaks remain. Continue to add the almond mixture in quarters, folding until you reach the proper batter. (More on this below)
Pour the batter into your prepared piping bag and pipe rows of batter (dollops a little bigger than a quarter) onto the baking sheets, giving them space to spread.
Tap the pan on the counter to bring up any air bubbles and quickly pop them with a toothpick.
Allow the cookies to rest on a level surface for 30-60 minutes. Until they are no longer tacky to a light touch. If you have problems with burst shells, you may need to allow them to rest longer or double stack your baking sheets to provided better insulation from the bottom.
While they rest, place an oven rack in the lower 3rd of your oven and preheat to 275-310°F (I've had the most success with about 285-290°F). I do not use fan-forced (convection) heat. If your oven tends to brown the cookies, consider placing a rack in the top of the oven with a baking sheet on it to shield the cookies. Occasionally my top element in my spastic electric oven turns on and browns my cookies, upsetting me greatly.
Bake the cookies for 16-20 minutes.
That out of the way, let's get to the details now...
Equipment:
Silicone baking liner vs. Parchment: I've tested and retested and found that on average I get the best results from parchment. The precut sheets you can find online and in bakery supply stores in particular (they're great). Parchment from a roll tends not to lay flat (even with a little extra macaron batter tacked to the corners to help it stay down) and that can sometimes make my macarons look a bit more like amoebas than round cookies.
I have found that parchment produces taller compact feet, the Silpat baked cookies' feet tend to be shorter and a bit ruffled. In my kitchen, at temperatures under 300°F, the cookie's bottom tends to lift off the slipat and cling to the top of the shell, making a little hollow under the cookie. This makes them easy to remove and the macs don't have a gap between the cookie's insides and the top of the shell. Which if you're having trouble with hollow at the top macs, could be a good thing.
The down side of parchment is that the surface can be uneven (particularly if you reuse your sheets), prone to crumpling up when you tear them off the roll, or like I mentioned, don't lay flat. You can often help the latter of those issues by gluing the sheet to the pan with little splots of macaron batter.
Silicone baking liners (I use the Mui brand) are nice because they're reusable (rolls of parchment run me $4-5 (ridiculous) at the grocery store, I hate buying parchment (parchment and garbage bags! Grrr)), perfectly level and may add extra insulation to the bottom of the shells (which could be good for bursting shells issues).
Hand Mixer vs Stand Mixer: Long ago I eschewed my stand mixer for a hand mixer when it comes to making macarons. Proving that sometimes inexpensive kitchen gadgetry can produce the best results. While I own two stand mixers and neither of them can make a decent meringue from a small amount of whites. This is due to the small volumes of whites called for and the fact that the meringue is difficult to monitor in the bowl as it mixes. It is hard to see into those deep bowls, the view is obstructed by the mixing arm and the powerful mixers can quickly take a almost-there meringue to an over-beaten mess.
I'll even hand whisk a meringue before I use my stand mixer. Great for beefing up your forearms...
So my mixer. I use one with wire whisk attachments (as well as standard and 'European' beaters and a hilariouspadded, travel-esque case) and I have been very happy with its ability to whip up good meringue.
Copper vs Everything: Folks who have been reading my blog for a while should be aware that I bought a copper bowl a while back. It arrived a few weeks ago and I've been making macarons, meringues (remember those chocolate meringues...) and Swiss butter creams with it ever since.
Let's talk copper review for a moment...
I am absolutely in love with my bowl.
I love it like a child, a child that does exactly what I want.
It makes absolutely beautiful meringues. Dense, glossy and almost impossible to over-beat. Yes, that's right. No more grainy broken meringues in this household. It has fulfilled every promise touted by its proponents (those discussed in length in the Chemistry & Beauty post).
I'm not going to imply that it is impossible, or even difficult to make macarons without a shiny copper bowl, of course you can make great meringue in a stainless steel bowl. Copper just makes meringue so much easier (near fool proof).
Every batch of meringues I have made has been phenomenal. Strong, dense and glossy. Chemistry rocks.
The maintenance isn't as bad as I had expected. Before using, I sprinkle a little salt onto a slice of lemon and rub down the bowl, removing any trace of oxidation. Then I rinse the salt and lemon juice off the bowl, dry and start whipping my eggs. Clean up is easy, just a little soapy water and a thorough drying to prevent spots. It is still as shiny as the day it arrived, though I suppose the daily use prevents it acquiring much of a tarnish.
Despite being expensive and its usefulness limited to beating eggs, I'm completely smitten by the bowl. I should have bought one long ago. I'm so committed to copper now that I bought a second bowl to give to Mother Humble (sorry to ruin the surprise, Mom but you didn't show up last week).
I bought Mauviel brand bowls, however it is not necessary to go out and drop a lot of money on a fancy French beating bowl. There are less expensive bowls on the market that offer the rounded bottom and copper ions perfect for beating meringue. Old Dutch makes copper bowls for a fraction of Mauviel. The one catch is Old Dutch bowls are coated with a thin layer of varnish to keep it from tarnishing (in case you wish to use it as a decorative piece, fruit bowl, etc). The varnish needs to be removed before you can cook with it, which requires a $4-5 trip to the hardware store for a striping agent. So, if you or someone you know doesn't mind the smell of solvents, you can pick up a Old Dutch bowl for the price of a few large pizzas.
Alright, I've said my piece about copper bowls. Back to the macarons...
Ingredients:
Almonds. I've made wonderful macarons with either slivered blanched almonds or almond meal. I'm a big fan of Bob's Red Mill almond meal/flour (usually found on the baking aisle of many grocery stores with the specialty flours, or hidden with the organic food). However, when I am making hundreds of cookies (like I have been) I trade convenience for economy. If you have a food processor you can weigh out the required amount of silvered blanched almonds along with the powdered sugar. Blend in your food processor for a few minutes and then sift the mixture through a medium sieve and then reprocess anything left behind.
Do this until everything falls through neatly. This should allow you to achieve nice smooth shelled macarons without any lumps or bumps.
Powdered Sugar: I use starched powdered sugar, despite its reputation for being ill suited for macarons. Unfortunately, powdered sugar without starch is near impossible to find in retail stores in the U.S.. It appears if I want to bake with it, I need to order it from a specialty shop.
Pressed for time and wanting to know what influence 5% starched sugar has on my macarons I decided I was going to make my OWN powdered sugar. Equipped with absurdly over priced, superfine sugar ($6 a pound?! Who buys this stuff? Madness!) and a blender, I set about making it.
I processed the sugar in the blender for a couple minutes until it turned into a fine powder. I probably could of let it run another few minutes but my blender was getting hot and I wasn't about to destroy any appliances in my quest for perfect macarons.
This is what I ended up with. It was close but not quite. Powdery, but not quite 10X.
So I baked two batches of macarons with this sugar.
Round #!!
WOAH!
That is not right. The cookies were feet-less and cracked. Total macawrongs! Finally, I've made a true foot-less mac! Woo!
The insides vaguely resembled a normal macaron and the smell was... weird. Like toasted marshmallow. Perhaps I undermixed? After all that can lead to puffy macarons with no feet. Perhaps I didn't allow them to dry long enough? I did place them in the oven after 30 minutes and they were still tacky to the touch (I was impatient...what can I say). Maybe my sugar wasn't fine enough and didn't dissolve like powdered sugar would? Is that why they smell like sugary marshmallows?
So I decided to test them again. The same recipe, the same sugar, only this time I would learn towards over mixing a little and allow them plenty of time to dry.
I allowed my second tray of starchless-blender-sugar macarons to sit out for over an hour and it was STILL tacky. Then I let a fan blow on it for another 20 min to help them along.
After 20 minutes they were still tacky but I baked them anyway.
The result?
On the right. I believe they're flatter coming out of the oven than going in. Flat, feetless monstrosity. I'm so proud.
Clearly substituting superfine sugar or homemade powdered sugar for a commercially made variety kills macarons. The Starch vs No-Starch mystery persists, I'll have to get my hands on a bag of it sometime soon and update this post.
Eggs:
I separate my eggs and leave the whites in a bowl on the counter covered lightly with a paper towel for at least 24 hours. All my French meringue attempts have been done with aged eggs, I just didn't have time to multiply all the different tests x3 (farm fresh whites, 24hr aged, 72hr aged, etc).
Mixing:
This is a great video of macarons being mixed. This is the technique I'm in the habit of using now. For some batches I would add all the almond/sugar mixture to the meringue at once (as recommended by some recipes) and then fold. Which produces better cookies? Difficult to say, they tend to have similar results. Still, I like doing it this way and feel it is a great demonstration.
Baking:
How to bake a French meringue macaron? If only I had a dollar for all the different techniques I've seen suggested.
Some recommend a higher initial temperature in the oven and then dropping it. Others recommend a consistent temperature.
Some keep the oven cracked all the time, some part of the time, some not at all.
In terms of testing, I had my work cut out for me.
One of my most reliable sources (explaining how they learned it at pastry school) recommended placing the shells into a 350°F oven and then reducing the heat to around 300°F.
The results of this: it worked. I had to reduce the cooking time to 12-15min however. It is worth trying if you're having trouble with the low and steady method. I lean towards the low and steady method now as I've found it produces a slightly more agreeable macaron texture.
I've cooked the shells at the temperatures called for in my recipe with the oven cracked and the oven closed and have failed to notice a major difference in results. The idea of venting it is, I'm told, to help reduce the humidity in the oven. Perhaps my oven is well ventilated and this isn't necessary. If you're shells are completely hollow (from the insides collapsing after cooling) it might help to keep the oven cracked (keeping an eye on the temperature), a drier oven might help the cookies' interiors set. If you have a small pocket above a otherwise great interior, ignore it. It will disappear when the cookies are matured.
Overall, after testing several batches of macarons under different conditions, I found that temperatures in the range of 270-310°F for 15-20 minutes produced the best results (in my kitchen, mind you). The lower you go the longer you'll need to cook them. Minding them carefully as should you go too low and too long, you'll make extra-crisp meringues not macarons and they'll require a prolonged maturation to become proper macaron cookies. Too low and too brief and your cookies' will have hollow shells since the insides will never dry out enough to set and then collapse while cooling. While testing progressively lower temperatures (towards the 250-275°F range) I also noticed that the cookies were more likely to be hollow.
The higher range of temperatures I attempted resulted in good cookies but the texture inside is a little dry when completely cool--which is fine and will be fixed during maturation. The trick is finding the time/temp spot in your oven where the interior of the cookie sets during baking so it will not collapse when cooling, creating hollows.
I did not test French meringue macs at prolonged high temperatures, only for the hot-then-drop method would I go above 335°F. I'm not certain of the logic of the hot-then drop method, I assume the initial heat is to give the cookies a good rise and foot development and then they drop the temp to gently cook the inside. It does not produce a taller cookie or more impressive foot. It does work, it simply seems to be an alternative method of baking--one that I tend to avoid recommending because depending on the baker's oven it carries an increased risk of browning, burst shells and irregular foot formation.
What is the best method?
Honestly, there is probably a range of times and temps (baking at or dropping down to 275°F-335°F) that will produce good results. I don't think it is possible to pinpoint a universal sweet spot as variations in humidity, altitude, ingredients, meringue, mixing and above all, ovens that prevent me (or anyone) from giving universally applicable advice.
I can simply offer advice in the form of what works for me.
Macaron Fillings:
Clockwise from top: Mascarpone Cheese, Caramel, White Chocolate Ganache, Bitter Sweet Chocolate Ganache, Homemade Raspberry Jam.
There are so many ways to fill macarons. Rather than post recipes for specific fillings I'm going to provided a few basic recipes, bits of advice to set you on the path to creating your own macarons.
One always needs to be conscious of the moisture content of whatever filling they are using. Too much moisture and it will eat through the shell. Too little and the macaron cookie may be dry and flavorless. The idea is that during maturation the filling permeates the inside of the cookie both improving the texture and imparting flavor.
Lets start with jams. A very simple, delicious and low-fuss filling. If too watery, gently heat the jam in a sauce pan to evaporate some moisture--for advanced bakers, experiment with adding pectin to thicken.
To make my BittersweetRaspberry Rosewater Macarons: Add a few drops of rose water to 1/3 cup good quality raspberry jam that has been strained to remove the seeds. Use the rose water sparingly, you're aiming for a raspberry flavor that has a floral note that lingers towards the end. Pipe a ring of bittersweet ganache onto the bottom of a macaron and then spoon a small dollup of the rosewater jam into the center. Top with a second macaron to complete the cookie.
To make ganaches here are a few basic recipes:
Bittersweet Ganache
9 oz bittersweet chocolate
8 oz heavy cream
White Chocolate Ganache
9 oz white chocolate
4 oz heavy cream
Finely chop the chocolate and place into a heat safe bowl. Heat the cream to a simmer over medium heat and then pour over the chocolate. Give the bowl a gentle shake to settle the mixture and allow to stand for one minute. Stir the chocolate slowly until completely melted. Strain through a fine sieve if desired for a perfectly smooth ganache. Allow to stand at room temprature, stiring occasionally until firm enough to pipe.
Store the leftovers in the fridge, bringing to room temperature before using.
One of the ways you can flavor ganache is by infusing the cream. Add coffee granules, tea, vanilla bean, spices, lemon grass, etc (If you're infusing with chunky things you'll need to strain the cream when you add it to the chocolate). Also add any water based flavorings you wish to use now. Chocolate doesn't jive with water, so it is best to add any liquid ingredients to the cream when trying to flavor the ganache.
You can mix non watery ingredients with the ganache after it is set. I like adding a little caramel and crushed praline to my white chocolate ganache to make my White Chocolate Caramel Crunch Macarons. Mix 4 parts white chocolate ganache with 1 part caramel and mix in a sprinkling of crushed praline (I've been using hazelnut praline). Delicious.
I really enjoy fruit fillings in my macarons. I have a freezer full of purees. I buy fruit when it is in season (best flavor and lowest cost, win!) and then puree it (90% fruit 10% granulated sugar) in my blender. I then strain the mixture and freeze it for use in sauces, homemade chocolates, cheesecakes and of course macarons, year round.
Frozen berries, fresh citrus and mango, strawberry and blueberry purees
I add the mixture to butter cream, white chocolate ganache or marscarpone cheese.
Zest is great for infusing cream in ganache or flavoring butter cream. Lemon curd is also lovely mixed with a little mascarpone (try to choose curds that do not have a high moisture content).
My favorite filling for macarons is Swiss meringue butter cream. Maybe it is because I love butter (I keep a supply of butter on hand that would appall even butter-fanatic Paul Dean). It is delicious, not too sweet, can play host to many flavors. It also matures the macarons quickly. (Other butter creams are also useful, I just prefer the swiss meringue style.)
I use either an Ateco #11 or #804 tips to pipe the fillings onto macarons seen on this blog. Unless I use a ziplock baggie... in which case I sandwich the cookie a little closer in the hopes you don't notice my less than perfect results. I tend to be generous when filling macs for the blog as it looks yummy, in reality you'll want to use a bit less. That much filling tends to squish out when bit into....
Things that do not make good macaron fillings: Anything moist, runny or unstable!
You want your filling to stay put and not break down while your cookie matures. Wet fillings will dissolve your cookies. I've seen pastry cream, plain whip cream, and other moist ingredients recommend as fillings. These will result in the sad discovery that your cookies are, or are beginning to become, icky sludge.
If you must use wet filling, skip the maturation and eat them ASAP.
Maturation:
This is really important. Try not to judge the quality of your macarons until they've finished maturation. It fixes a whole host of evils. Small hollows disappear, dry insides can become moist again, the texture improves and of course the flavor, maturation really makes a difference there.
Generally 1-3 days in a loosely covered container in the refrigerator does the trick. The more moisture in the filling, the quicker it will mature. Mascarpone, cream cheese, curd-based, caramels and some butter creams will mature first, followed by white chocolate ganache and then chocolate ganache.
Always bring the macarons to room temperature before serving.
If you're feeling as though your macarons are not turning out "right", give them a chance to mature and then give them a bite. You might be surprised.
Okay...
It's almost 3am in Seattle now, this post is a monster...I think it is time to wrap up.
I'll be taking a couple days break to recover from all my work these past few weeks. I'm exhausted and I've been neglecting my laundry....
I'll leave you all with this photo because it is awesome.
Busy weekend. Mother Humble's visit from London was canceled because the Eyjafjotoomanyconsonantsjkull volcaono in Iceland is filling the skies over Europe with ash. She's postponing her visit until early next month and then we're leaving to visit her a week after that.
Meaning, that volcano needs to knock this whole eruption business off.
Seriously. I want all that ash to go away. Not just at low enough levels to fly through.
Gone.
I'm one of those people who truly hate flying. Even though I'm no stranger to air travel, I figure I'm doomed every time I step on a plane (I don't know how you do it Mr. P). I don't need the idea of ash filled engines fluttering through my head for the 18 hour trip.
(shudder)
So this weekend I spent wrapping up the French Macaron 101. Well, almost wrapped up. Midway through the last few batches baking I had lined up, I dropped my much loved kitchen scale (RIP). So Mr. Humble will be bringing one home later today so I'll pick up with the macarons tomorrow and hopefully will have everything complete soon.
Lacking the complete macaron 101, I'm falling back on some of the other treats I made this weekend. Let's see, I have ice creams, pirogi, lamb, cookies... hmm.
Cookies!
More specifically ice box cookies. Though I am usually not a fan of ice box cookies--is there a version of that chocolate/vanilla stripe/bull's-eye cookie that is actually edible--I do love these. A light crisp cookie with the bright flavor of fresh lime that first crumbles and then melts in your mouth.
I've been on a bit of a lime kick lately, I know.
Anyway, these cookies are great for when want cookies but don't want to cook several dozen. The dough is kept chilled in your refrigerator or freezer and all you need to do when the cookie monster strikes, is carve off a couple slices and you're ready to bake.
Lime Meltaways adapted from Cookies 12 tablespoons (1 1/2 sticks) (170) unsalted butter, room temperature 1/3 cup (60g) powdered sugar Grated zest of 2 limes 2 tablespoons fresh lime juice 1 tablespoon pure vanilla extract 1 3/4 cups plus 2 tablespoons (274g) all-purpose flour 2 tablespoons (18g) cornstarch 1/4 teaspoon salt 1-2 drops lime green food coloring (optional)
powdered sugar for dusting
In a medium bowl, sift together the flour, cornstarch and salt and set aside.
In a large bowl beat butter and sugar on medium high speed until light and fluffy (if using a stand mixer use the whisk attachment for this step). Add the lime juice, zest and vanilla and beat the mixture until fluffy.
Reduce speed to low and add the flour mixer to the butter. Mix until combined.
Ready a two 8"x12" pieces of waxed paper or parchment. Divide the dough into two equal portions and roll into two 1.25" diameter logs. Wrap the dough tightly in the waxed paper or parchment. (The cookies pictured are slightly larger, at roughly 2" in diameter. You can also form a single 2" diameter log, but keep in mind at this size they're not sturdy enough to toss in powdered sugar.)
Chill for at least an hour before baking. The dough can keep for a couple days chilled in the refrigerator or frozen for up to two months.
When ready to bake:
Heat the oven to 350°F and line a baking sheet with parchment. Slice the cookies 1/4" thick and place on the baking sheet. Bake for 15 minutes, rotating halfway through baking, until they just barely start to take on some color. Allow to cool until just warm. Fill a plastic bag with a 3/4 cup powdered sugar and add a few cookies. Working in batches, toss the cookies to coat. One can also coat them by sifting sugar over the cookies.
Store the cookies for up to two weeks in an air tight container.
No recipes to post today. Sometimes I spend my time in the kitchen experimenting. Like today, with french meringue macaron ratios.
Again.
Though 'Eleventybillion' is a bit of an exaggeration, sometimes it doesn't feel that way.
For the last two months I've been baking the occasional batch of french meringue macs and experimenting with the variables. I got caught up with another couple batches today and never got around to the dessert I was going to make for the blog today.
Oops.
I blame the macarons. I ate six and now I don't feel so well. (How do people eat dozens of these in a sitting anyway?!)
Anyway, today one of the things I was experimenting with was grinding my own almond meal. The result: slivered blanched almonds ground with powdered sugar is the easiest way to go.
Weigh out the portion of almond meal and powdered sugar called for in the recipe and grind them together in your food processor for 2-3 minutes. Sift with a medium mesh sieve and repeat until everything slips through.
Perfect. Now I can make macarons...
Bittersweet chocolate, raspberry, rose water, if you're curious.
They were good... a little too good. Now I need a nap.
I'm back and I've brought cheesecake! I was really excited this morning to slice into this cheesecake and taste it. While my husband was getting ready for work, I was brushing my teeth, channeling Liz Lemon, doing my 'I'm gonna' eat cheesecake for breakfast' song and dance routine.
Why he stays married to me I do not know.
So, I was given this recipe from a friend who insisted that I would love it. A recipe for white chocolate caramel cheesecake. She was right about me loving it, I've been itching to make it. How can one not love a cheesecake brazen enough to incorporate nearly a pound of white chocolate ganache into the batter and then slather the whole pie in caramel sauce?!
She was right, I love it. So delicious with a near perfect texture. Woooo!
Yea, I'm riding a serious cheesecake breakfast induced sugar high at the moment.
Feeling good. Let's get down to it...
White Chocolate Cheesecake with Caramel Glaze adapted from Ray's Boathouse: Seafood Secrets of the Pacific Northwest Caramel Sauce 1 1/2 cups granulated sugar 1 3/4 teaspoons lemon juice 1 pint heavy cream 4 tablespoons unsalted butter
Before I get into making the sauce, let me note that this isn't the easiest way for most home cooks to go about making caramel sauce. Melting almost pure sugar in a pan is pesky and it can burn quite easily. If you're not feeling up to attempting this part of the recipe, feel free to buy your favorite caramel sauce and warm it gently to glaze the cheesecake.
In a medium sauce pan over medium high heat (I'm using non-stick for this), combine the sugar and lemon juice. Stir with a wooden spoon until the sugar is mostly melted then set aside the spoon and swirl the pan over the heat to keep the color even throughout.
Continue to cook and swirl until it sugar turns a medium amber color. Watch it carefully, the sugar will quickly darken and should it become dark brown or black it will taste bitter and unpleasant.
When the sauce turns the right color slowly whisk in the cream. If the caramel hardens with the addition of the cream, do not worry. Just continue to add the cream and bring the mixture back to a a boil over medium heat. Continue to stir until the sugar has remelted. Allow to boil for 5 minutes then remove from heat and stir in the butter.
Pour into a heat safe container and chill until ready to use.
Crust 10 ounces graham crackers, crushed into crumbs 7 tablespoons unsalted butter
Cheesecake Filling 3 8-ounce packages of cream cheese, room temperature 1 1/4 cups granulated sugar 1/2 cup heavy cream 8 ounces good quality white chocolate, chopped 5 large eggs 1 teaspoon vanilla extract pinch salt
boiling water
Pre-heat the oven to 375°F. Combine the graham cracker crumbs with the melted butter and press into the bottom and 1 1/2 inches up the side of a 10 inch spring form pan.
Bake for 10 minutes and then allow to cool completely on a wire rack.
Reduce the heat to 325°F and prepare the cheesecake batter.
Place the chopped white chocolate into a heat safe bowl and set aside. Bring the 1/2 cup of cream to a simmer over medium heat in a small sauce pan. Pour the hot cream over the white chocolate, jiggle the bowl to submerge it and allow to stand for one minute. Stir the chocolate gently until melted completely.
In your mixer with the paddle attachment, beat the cream cheese until smooth and lump free. Add the sugar and mix, scraping down the sides of the bowl as needed.
On medium speed, slowly add the white chocolate ganache. Once combined you can add the eggs, one at a time, beating on low speed until each egg is incorporated. Once you've added all the eggs, mix in the vanilla and salt and pour into your prepared pan.
Set the pan onto a couple large sheets of aluminum foil and smooth them up the sides of the pan to waterproof.
Set the cheesecake into a large roasting pan and then place in the oven. Pour the boiling water into the roasting pan, filling to about one inch (no higher than the lowest edge of aluminum foil). Allow to make at 325°F for one hour then reduce heat and bake at 300°F for an additional 60-90 minutes until the center is just set.
Remove from the oven and allow to cool completely on a wire rack. Once cool chill for at least 4 hours before serving.
To glaze, gently warm the 1 cup of the caramel sauce on the stove or in the microwave until slightly runny and then pour onto the cheesecake. Smooth the caramel over the cake and you're ready to serve.


 The one thing I hate about layer cakes is cutting them.