Sunday, May 30, 2010

Strawberry Rhubarb Pie & Apple Pirate Ship Pie


Blogging from Scotland today. Mr. Humble and Co. are out braving the weather and hiking up Arthur's Seat. I'm back at the B&B with the little Humble, letting her get some desperately needed rest and travel detox.


Although in Scotland for less than a day I've already eaten Haggis (delicious when you don't bother to think about what is in it), black pudding (ditto) and cullen skink (nom-riffic).

Tomorrow afternoon I'm heading back to London and then home to Seattle the day after. Depending on how all that traveling works out, there may be a little lag in posting.

I can't wait to be back home and in my own kitchen again. I need to bake something!

A little Scottish food for any foodie-tourists:

Cullen Skink


Haggis with neaps and tatties and a… tarragon (?) cream sauce.


A full Scottish breakfast of bacon (cut from the back so it includes part of the loin), sausage, black pudding, eggs (poached rather than fried, a vain attempt to make this breakfast a bit healthier), toast, saute mushrooms and tomato.
I needed a three hour nap after this.


Today's pies:


Kaitlin of Whisk-Kid is one of the youngest and probably one of the better known bloggers to enter into the pie contest. Her popularity is easy to understand, she makes beautiful food, takes gorgeous photos and has a rather J.Peterman-esque flair to her food blogging.

Kaitlin sent me her strawberry rhubarb pie, inspired by her grandmother's cooking.


Strawberry Rhubarb Pie

This is more of a guide than anything. Keep in mind that it's not intended to be very sweet and that the sugar will need to be adjusted if you like your pie more sugary.
from Whisk-Kid
14 oz (400g)(total) of strawberries and rhubarb, chopped roughly into 1/4" to 1/2" pieces
1/8 c + 1 Tbls (25g) flour
1/4 c (50g) sugar
1/2 tsp salt
cream
sanding sugar

Combine the chopped fruit, flour, sugar and salt in a large bowl. Toss to combine and pour into a prepared shell. Refrigerate while you prepare lattice strips, then top with lattice and place in the fridge.

Preheat the oven to 450F (230C). When ready to bake, remove the pie from the fridge and brush the crust with cream. Sprinkle liberally with sanding sugar and cover loosely with aluminum foil. Place in the middle of the oven and place another pan, covered with aluminum foil, on the rack below to catch drips.

Bake 30 minutes, reduce the heat to 350F (175C) and bake until golden and bubbly, 40-50 minutes longer.

Cool completely on a rack before slicing.


Pie Crust
via my man, Alton Brown
I love, love, love this recipe! Make a bunch and freeze it. It'll make you happy in a few weeks when you really want some pie! Makes enough for a double-crust 9" pie.

12 tablespoons (170g) butter, chilled
4 tablespoons (55g) lard, chilled (can use shortening)
2 cups (340g) flour, plus extra for rolling dough
1 teaspoon table salt
1/2 cup (120ml) ice water, in spritz bottle (I usually use only about 3/4s of the amount and, sorry Alton, I don't have a spritz bottle. I just pour it in!)

Place butter and lard in freezer for 15 minutes. When ready to use, remove and cut both into small pieces.

In the bowl of a food processor, combine flour and salt by pulsing 3 to 4 times. Add butter and pulse 5 to 6 times until texture looks mealy. Add lard (or shortening) and pulse another 3 to 4 times. Remove lid of food processor and spritz surface of mixture thoroughly with water. Replace lid and pulse 5 times. Add more water and pulse again until mixture holds together when squeezed. Pour onto counter and press the dough together until it forms a ball. Separate into two pieces, then wrap in plastic wrap and chill for at least 30 minutes.

After 30 minutes, place one half of the dough on the counter and roll into an 11" circle. Line pie tin and place in the refrigerator. Prepare filling.

To make lattice, roll out the dough to an 11" circle and cut thin strips with a pizza wheel. Weave over the filled pie and chill while the oven preheats.


Diamonds For Dessert is a blog with such charm and whimsy that I've been smitten with it from the moment I discovered it. Susan--another biologist blogger--makes some of the cutest, craftiest food-creations on the planet and it pains me deeply not to be on her list of recipients for Christmas cookies.

Really.

Cookies.

Please, Susan.

This pie submission is a ship--a pie-rate ship. Proving that when puns and pastry combine, awesome things happen.


APPLE PIE-rate ship

adapted from cookinglight.com
from Diamonds For Dessert
2 1/2 cups flour
1/2 t salt
1/2 cup shortening
1/2 cup ice water
nonstick spray

4 apples (I used granny smith and braeburn)
6 T sugar
3/4 T flour
1/2 t cinnamon
1/4 t salt
a pinch of nutmeg
1 egg

pie weights, dried beans, or dried rice
coffee filters or parchment paper
2 aluminum mini loaf pans (5x2.5 inches)
2 pairs of disposable chopsticks
3 bamboo skewers
foil
tape and a glue gun
black and red marker

In a bowl, combine the flour and salt, and mix. Cut the shortening into small pieces and add them into the bowl. Use a pastry cutter or a fork to incorporate the shortening until there are pea sized lumps. Add the ice water one tablespoon at a time, gently mixing it in, letting it moisten the dough. Gather the dough into a ball and split it in two. Place each half on a piece of plastic wrap. Flatten each into a disc, fold over the plastic wrap, and chill in the fridge for 30 minutes.

While waiting, prepare the apples. Peel and core the apples. Thinly slice them and then chop the slices into thirds. Place the apples pieces in a mixing bowl. Add the sugar, salt, flour, cinnamon, and nutmeg. Gently mix. Cover the mixture with plastic wrap until ready to use.

Preparing the Pans
For the two mini loaf pans, grab the center of one of the smaller sides and pull it out so it makes a point. so now instead of rectangles, the pans have 3 of the original sides and a little pointy side. Take a large piece of foil and wrap it around one of the pans, using it to extend the short pointy side to make a longer point. Fold the excess foil over the other pan edges. Spray both pans with nonstick spray.

Preheat the oven to 425°F. Take one disc of dough and place it between two large pieces of plastic wrap. Roll it out to a 12x10 inch rectangle. Peel off a piece of plastic wrap and cut it so the dough rectangle is split into two pieces, one that's 9x10 inches and another that's 3x10 inches (refrigerate the 3x10 inch pieces).


Shaping the Bottom Crust
Take the 9x10 inch rectangle and place it into the prepared mini loaf pan and stretch it to fit the mold. Trim the overhanging extra dough with kitchen shears. (If desired, in the center of the longer edges, a little notch of dough can be cut off for aesthetic purposes, to make the ship more "ship-like" in appearance). Repeat all of this with the other disc of dough and the other mini loaf pan. Take a fork and poke holes all over the doughs to prevent bumps forming in the crust when baking.

Spray two coffee filters with nonstick spray and place them on the dough in the pans (or two pieces of parchment paper can be used instead); this keeps the pie weights from touching the dough and will make it easier to take them out. Fill the pans with the pie weights or dried beans or dried rice. Place the two filled pans on a baking sheet and then place the sheet in the oven for 15 minutes. When done, take the sheet out of the oven and let the crusts cool.

Shaping the Top Crust
Once cool, take the apple filling and spoon it into the two crusts, filling to about 1/4 inch from the top of the crust. Take the 3x10 inch pieces of pie dough out from the fridge and place them onto the crusts. Seal the dough by pinching around the top 1/4 inch of the crust. Trim the excess overhanging dough. Then take a fork and press it around the crust edge to make sure that it's firmly sealed. Take a knife and cut slits in the dough for vent holes. Mix the egg with 1 teaspoon of water to create an egg wash and brush the tops of the pies. Then place them in the oven on the baking sheet for 10 minutes.

After 10 minutes, lower the oven temperature to 350°F and continue baking for 35 minutes. If the pointy part of the "ship" or the edges start to brown too much, rip off small pieces of foil to cover them. Once done, take the pies out of the oven to let them cool. When completely cool, carefully remove the pies from the aluminum pans. Preheat the oven to 425°F. Cover a baking sheet with parchment paper and place the pies on the sheet. Take the rest of the egg wash and brush the pie sides with it. Cover the top of the pies and the pointy part of the "ships" with foil. Bake the pies for 15 minutes. Check and see if the sides are dry and turning golden brown. If so, take the pies out of the oven and let cool. If not, continue letting them bake until the pie sides are dry and golden brown. Then remove from the oven and let cool.

Adding the Sails
Take a bamboo skewer and poke two holes in the pie: one hole 1/3 from the one end of the pie and the other hole from the other end of the pie. Enlarge the holes with the skewer so they're big enough to fit the chopsticks.

To make the masts, split the chopstick pairs. Carefully break two chopsticks so that they are 7 inches long and the other two so that they are 6 inches long, and cut off any loose splinters. Carefully cut the skewers so you have eight 3 inch pieces. Hot glue one bamboo skewer piece 1 inch from the top of the chopstick and glue the other piece 3 inches from the top of the chopstick, both skewer pieces should be perpendicular to the chopstick.

For the sails, cut out 3x3 inch squares from the piece of white paper. Fold a little bit at the top and the bottom of each square. Cut out a little notch in the center of the parts that were just folded. Now take the four sails and attach them to the bamboo skewers by wrapping the top and bottom folded parts around the skewers and taping them down, with the chopstick fitting into the notches that were cut.

For the flags, cut out four 3/4x1/2 inch rectangles from the piece of white paper. Fold a little tab on one of the shorter sides of each rectangle (this will make it easier to tape the flags on the chopstick later). On two of them, draw skull and crossbones and color them black. Color the other two red and cut out a triangle from one of the shorter sides. Tape the flags to the tops of the chopsticks by taping the folded tabs to chopstick. Now stick the finished masts into the pies.

Makes 2 pie ships

Saturday, May 29, 2010

Banana Blender Pie & Beef n' Mushroom "Pudding" Pie


Sitting on a train making my way to Scotland this morning (and working on this post when the train's wifi allows it).

My outing yesterday didn't exactly go as planned. I managed to visit Burough market, though only after considerable walking. I, having no sense of direction or ability to read maps, got completely lost. My slight mix-up between London Bridge and Tower Bridge didn't help much either. So I ended up walking all over Southwark looking for the market and by the time that I realized where the market really was, I had burned out the little Humble's patience--which was about nil to begin with.

Live music in Burough Market


Mr. Humble and I managed to stop by Monmouth for a cup of coffee. A very bold and smooth brew. The exceptionally long lines outside the shop seemed justified. Though, filter coffee feels a wee bit pricey in this part of the world. Prices from £2 to £2.50 for a basic cup of joe seems like a lot (not just at Monmouth, train station coffee is just as much) and this is coming from a native of the overpriced coffee capital of the world.

If you squint you can see Monmouth in the background there...


Once we had coffee in hand, our ability to shop/eat basically ended. Little Humble decided our outing greatly offended her and she started to pitch a fit. So we quickly walked through, hungrily eying the food and all those free samples, unable to approach any vendors for fear of the little Humble's thrashing causing bodily injury to the patrons.


Ah yes, the joys of traveling with a toddler. I wonder if it gets easier or harder as she gets older...

Anyway, I did at least get some photos. There were so many yummy things: meats, cheeses (the Comte I could not find and I am miserable about it), breads, pastry, chocolates, and meat pies. I'll definitely try to make it back to this market when I visit Mother Humble again. As for the rest of my trip, I'll be in Scotland and not certain if I'll be able to make it back into the city again. Boo.


So today's pies! We're going with an English theme today. The first pie is made by a real actual Englishman (I've checked his papers, he's legit) and the second is a savory pie adapted from meat and kidney classic.


Our first pie is from Mr. P of Delicious Delicious Delicious the pie is made in his beloved blender and after taking a quick trip to Waitrose I understand the attachment. Kitchen appliances are absurdly expensive here! I now understand why stand mixers are less common in the U.K., they're twice as expensive as in the U.S.! We're talking £399 for a tiny Kitchenaid mixer ($600)! Food processors also cost an arm and a leg. Someone needs to smuggle inexpensive U.S. appliances across the Atlantic for all the home cooks and bakers over here.

Let's get to Mr. P's Bad Language-Free Baked Banana Blender Pie:

awww, the fork is happy


OK, who thought there wasn't going to be a pie for April?

(Well, my hand is raised.)

Obviously, I take these pies very seriously indeed, for as soon as the kitchen was deemed usable, this was the first thing I rustled up. I would like to add that cleaning the kitchen, all of the downstairs and garden of dust and rubble after the departure of the workmen took all of Saturday and most of Sunday last weekend, hence the slightly more calorific pie content this month; we deserved it. If you have not spent the weekend cleaning and lifting rubble, but still wish to enjoy my pie, I suggest you make your main course a salad.

No time to make pastry for this one (which I know was the whole point of the pie series anyway, but let's do a Gordon Brown and just skirt around the issue on this, shall we?), so it is a slight cop-out for April: a biscuit crumb base. However, you mustn't feel too disappointed, because the whole thing is made in the blender (even the whipped cream top), so replace your sadness with glee and appreciation of my proclivity for kitchen appliances and let's make a pie. No need to be a malcontent.


(If you had my blender, you'd feel the same by the way. It's a KitchenAid, and was a gift from my mum and sister years ago - basically the best thing I have ever been given.)

The filling is banana and chocolate, which when baked smells somehow of caramel. I have not figured out why or how that can be the case, but presume there is science involved. Which is strangely appropriate because as April's pie was cooling on the counter, I was catching up on some of my favourite food blogs and noticed that Not So Humble Pie is having a virtual pie contest. So over to you Ms. Humble! Why does my entry (which the pie now is) smell like caramel?


I am unsure as to what to call my mysteriously caramel fragranced creation mind you. Drawn though I am to the alliteration of Mr. P's Bitchin' Baked Banana Blender Pie, my grandma reads this blog from time to time and I wouldn't want her to see my bad language. I am full of admiration for those who brazenly cuss on their blogs (swear words are so expressive!), but I'm reticent to follow suit. So I think it will have to be Mr. P's Bad Language-Free Baked Banana Blender Pie for now. That's not what I'm calling it at home though!

Reasons my Pie of the Month should win the Not So Humble Pie Contest:

* It is particularly scrumptious, even without swear words;
* Anybody could make it, even without a blender (see alternate method);
* Chocolate and banana is always a winning combination;
* Mr. P likes the idea of winning a mystery prize from Morocco.

Wish me luck! (Unless you also enter the competition. In that case watch your back!*)

*I am joking. Let's all be unified in our appreciation of the pie!


Mr. P's Bad Language-Free Baked Banana Blender Pie


You will need:

250g digestive biscuits
100g butter, melted
2 tbsp cocoa powder

4 bananas
2 eggs
300ml single cream
150g sugar
1 tsp vanilla extract
handful of chocolate chips

300ml double cream
1 tsp vanilla extract

1. This is easy as pie. In a blender, crush the biscuits until they become crumbs; mix these with the butter and cocoa and press the mixture into a 26cm springform cake tin. Mound the mixture up at the sides, so it becomes more of a pie shell than a base. If you don't have a blender, just bash the biscuits up with something heavy. Or get a blender.
2. Chill the crumbed mixture base for half an hour or so.
3. Blend the bananas, eggs, sugar, single cream and vanilla until smooth. Pour this (very liquid) mixture on to the biscuit crumb base, and sprinkle with as many chocolate chips as you like. No blender method: mash the bananas with a fork; add the eggs, sugar, cream and vanilla and mix until smooth.
4. Bake in a pre-heated oven at 180°C for 40 minutes, until the banana mixture has puffed up and set. (Your kitchen and home will smell unbelievable.)
5. Cool on a rack, and chill until needed.
6. Just before serving, whip the cream and vanilla extract (in the blender, or by hand) to soft peaks and use to top your pie.


Our next pie comes from Jacqueline of Food-ology, another scientist/baker who refers to her blog as her "kitchen lab notebook".

Jacqueline submitted the only savory pie to the contest, a variation on the classic steak and kidney pie. After touring the city and its markets and grocers I've realized Brits are quite fond of their meat pies. While in the Burough Market yesterday I saw dozens of beautifully made meat pies. Pies filled with a wide variety of critters, everything from boar to pheasant.

Mr. Humble is also a fan of the pies and is already pestering me to make one "for the blog" when we get home later this week.

Jacqueline's pie is really interesting, as it is steamed not baked. One might assume the crust would be overly moist but it looks so tender and delicious that I may experiment with this technique myself.

I'm ready to kick back and enjoy the rest of my train ride now, so lets get down to Jackie's beef and mushroom 'pudding' pie!


Last month when I was doing my Daring Baker's challenge we were given the option of making either a sweet British pudding (steamed cake) or savory pudding (a savory pie with crust). For the challenge I decided upon a steamed cake, but also wanted to try out the pie-crust method.

So I decided on trying a variation of a meat and kidney pie (sans kidneys...)

It's just like a regular pie, but instead of cooking it in a pie pan you steam it in a bowl. (Yea for having a slow cooker: 5 hours in a slow cooker uses a lot less energy than stovetop.)

I'm so glad I tried out this second version of British pudding- it came out delicious! (OK, it may not look super appealing, but certain foods taste a lot better than they look. This is one of them.)


This method (using suet pastry crust) can also be used for sweet pies as well. Sooo many possibilities, so little time.

To prepare the pie all you do is fill a pastry-lined bowl with a combination of flour-coated meat, onions and cooked mushrooms.

Then you pour in a combination of wine and oyster sauce, just enough to almost reach the top of the meat. (A little more than what I have.) Then cover the top with the remaining dough and seal it all up.

Cover the bowl in foil and seal the edges well. Place in a vessel and steam for 5 hours. (You can use a pot or a slow cooker.)

After it's done your crust will look lightly golden. I didn't really have a way of knowing if it was done or not, but all the recipes I read online said ~5 hours steaming so I figured it was good. Probably could have steamed it for longer and I'm sure it would have been fine.

Now- the moment of truth. Flipping it over and seeing if you can get it to not fall apart.

Step 1: Place large plate over bowl and carefully flip it over. SUCCESS!

Step 2: Cross your fingers in hope that step 3 works.

Step 3: Remove the bowl
SWEET!!! It totally worked!!!


Now go ahead and break open the crusty shell to reveal the deliciousness inside.

Mmmmmmm, delicious. All the flavors really just come together and the beef was the most tender I've ever prepared (for beef stew type of meat). It's just a great hearty, family style meal.

And the crust- can I take a moment to talk about the crust. (Well, it's my blog so I'll do whatever I like...) It was so good, like a cross between bread and a flaky pie crust. It was so tender and somewhat flaky as well. Surprising a texture like that could come out of a steam cooker.


Buen Provecho,
Jackie

Meat and mushroom "pudding"
adapted from recipes for meat and kidney pie
from Foodology

For the suet crust pastry
225 g/ 8 oz flour (1 ½ cups + ~ 1-2 TBSP)
2 tsp baking powder
115 g/ 4 oz rendered beef suet (or substitute like lard or Crisco)
salt and pepper
cold water, ~7-9 TBSP (more or less depending…)

For the filling
380g/13 ½ ozs chuck steak
1 lb mushrooms, quartered
1 small onion, sliced
3 TBPS of oyster sauce and enough red dry wine to make ~3/4 cup
Worcestershire sauce
3-4 TBSP flour, seasoned with salt and black pepper
1-2 fresh bay leafs

Directions

1. Butter your bowl (1 liter/1 quart capacity pudding basin or glass bowl). Also prepare the steamer (i.e. get the liquid heated and ready to steam either in your pot or your slow cooker set to high.)

2. Cook mushrooms ~5-10 minutes, until nicely browned. (I cooked the mushrooms so that they release their liquid now and the pie wouldn’t get too watery later.) Season lightly with salt and pepper.

3. Cut chuck into small (1 inch) cubes. Set aside.

4. For the pastry, sift flour, baking powder, salt and pepper into large mixing bowl. Then add the suet and mix it into the flour using a pastry cutter or the blade of a knife. Add water, 1 TBSP at a time, until the dough comes together. This will vary depending on many factors so once you’ve added 6 or so TBSP, start adding the liquid in smaller amounts.

5. Once the dough gets too sticky for the knife, use your hands and bring it all together until you have a nice smooth elastic dough, which leaves the bowl clean. It's worth noting that suet pastry always needs more water than other types, so if it is still a bit dry just go on adding a few drops at a time.

6. Reserve ¼ of the dough for the lid, then roll the rest out into a 9-10 inch circle (it will be fairly thick), or just enough to reach the top of your bowl. Line the greased bowl with the dough, pressing it all around.

7. You are now ready to start preparing the filling. Toss the steak in the seasoned flour and shake off the excess flour. Layer 1/3 of the meat, 1/3 of the sliced onions and 1/3 of the mushrooms in the pastry-lined bowl. Repeat until all the meat and veggies have been added.

8. In a measuring cup combine oyster sauce, red wine and a few shakes of Worcestershire sauce. Pour mixture over the steak. (The liquid should be semi-high but below the surface of the steak.)

9. Roll out the remaining ¼ pastry for the lid, dampen its edges and place over the steak. Seal well and cover with a double sheet of foil.

10. Place in the steamer and steam for 5 hours, making sure to watch the level of the liquid in your steamer.

Friday, May 28, 2010

Autumn Pear Pie & California Cutie Pie


Happy Friday all! I'm off to Borough Market this morning to take in the foodie sights (and then eat them!). Afterward, I'm going on a bakery prowl and then on to the Natural History Museum since the little humble loves those 'saurs (dinosaurs) so much.

Last night we enjoyed some whitebait, ale battered fish and chips, welsh rarebit and sticky toffee pudding at the Trafalgar Tavern. I've seen the pretty regency style building with its balconies and columns sitting picturesquely on the Thames as I pass via Clipper.


Welsh Rarebit

Whitebait

According to the Trafalgar Tavern's not so humble website:
In Victorian London there was one pub that represented the best of Britain’s naval might and cultural standing. A place where William Gladstone and Charles Dickens could be seen dining side-by-side. An oasis away from the industrial sprawl, but yet at the centre of an Empire. Exactly 170 years later the Trafalgar Tavern still stands in the Greenwich Maritime World Heritage Site, and it remains one of London’s most essential public houses.
Charles Dickens and HUGE pieces of beer batter slathered fish! Literary Nom.


Sticky Toffee Pudding with Vanilla Ice Cream

Okay, with the foodie-tourism out of the way, it is pie contest time!

Today's pies come from 'The Cilantropist' of cilantropist.blogspot.com. She is another scientist/foodie and I am fiercely jealous of her ridiculously clever blog name. She also makes incredibly gorgeous food.

Serious, go look at that lemoncello honey yogurt thing she has on her blog today. Gorgeous! I have yet to have breakfast yet and it makes me want to abandon this post to go cook.


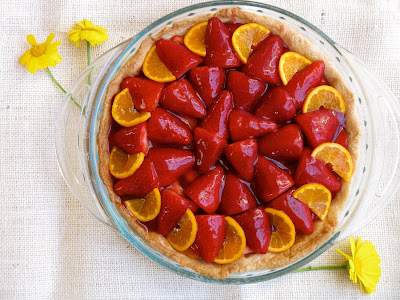
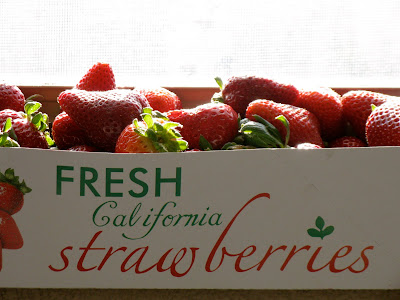
Here in California we have an abundance of huge, beautiful, ripe strawberries and I have been buying them like crazy. I feel like I am powerless to resist their sweet pull! I have made a few different recipes with them so far, but this is one of the most good-looking and delicious.

I am not really sure how popular Strawberry Pie is out on the west coast, but growing up in the Midwest we had strawberry pie all the time, and it is quite popular in a lot of diners. It is always heaping with strawberries, and served with a big dollop of whipped cream. I wanted to replicate that here, but with more of a California feel to it. :) As I mentioned strawberries are in season here, and I always get mine from the local farmers market. The strawberries they sell are outstanding, and they are picked up in Carlsbad, which is just about 15 minutes north of where I live.


Also around this time of year, you can buy bags of these adorable little California clementines. They are so tiny, that they would just fit in the center of your cupped hand (maybe a little bigger than a golf ball). On the bag they always call them "California Cuties" and they are definitely cute. So to make this a California strawberry pie, I used the local strawberries and I also included some clementine segments in the filling. To make the glaze, I juiced additional clementines and extracted juice from the strawberries, although in my recipe you could really use any fruit juice. I also included some lemon zest in my butter crust to compliment the fruit filling. This pie was so delicious and was just stunning to look at too, I almost didn't want to cut it! Perfect for summer!

It was also a good chance for me to try my hand at "blind baking" a crust. I have made loads of pies before, but it occurred to me that all of them were filled and then baked. I have to be honest, it took me two tries until I got this crust right! Now I will be a pro at crust-baking.


California Cutie Pie, or California Strawberry Pie
from the cilanthropist.blogspot.com
All-butter pastry dough:
1¼ c all-purpose flour
1 stick cold unsalted butter, cut into ½-inch cubes
¼ tsp salt
2 teaspoons grated lemon peel (optional)
5 tablespoons ice water (or less)


Filling and Glaze:

At least 4 cups strawberries, hulled (one large flat, I think it has 3 pints)
5 clementine oranges (or 6 if you want to use one for topping)
1/4 cup sugar
3 tablespoons cornstarch
1 cup water
1 cup total fruit juice (juice from clementines, plus additional juice from concentrate or other source)

For pastry dough, blend together flour, butter, and salt in a bowl with your fingertips or pulse in a food processor (easiest) until most of mixture resembles coarse sand with some roughly pea-size butter lumps. Add lemon peel and pulse a few more times. Drizzle 3 tablespoons ice water evenly over mixture and or pulse until incorporated. Squeeze a small handful: If it doesn’t hold together, add more ice water, ½ tablespoon at a time, pulsing until incorporated, then test again. Dough will eventually be pliable but not too sticky. Turn out dough onto a lightly floured surface and work with hands for a minute or two to evenly distribute butter. Press dough into a ball, then flatten into a 5-inch disk. Chill, wrapped in plastic wrap at least 1 hour or overnight.

When ready to bake the crust, preheat oven to 425°F. Roll out the dough on a lightly floured surface into a roughly 13-inch round. Fit into a 9-inch pie plate. Fold edge overhangs for top of crust, and pierce crust all over with a fork. Cover entire crust and sides with large piece of aluminum foil, pressing down into curvature of pie center and sides; fill with dried beans or pie weights. Bake pie crust 20 minutes, then remove foil and pie weights; crust will be lightly golden. Bake for an additional 5-8 minutes until crust is browned and fully baked. Remove from oven, immediately brush with a thin layer of egg white, and cool on a rack.


Meanwhile, make glaze and prepare the filling. For about 3/4 of the strawberries, cut into 1/4 inch slices and place in a medium bowl. For the other 1/4 (try to choose berries that are roughly the same size), slice in half lengthwise, and set aside. Segment the five clementines, cutting over a small bowl to catch all the juices, and put the segments in the medium bowl with the strawberries. To make the glaze, combine sugar and cornstarch in a medium saucepan and mix, then add water, juice from clementines, and juice concentrate (or fruit juice). Warm over medium heat until mixture starts to boil and thicken, and then boil for one additional minute; remove from heat and allow to cool completely.

Assemble pie. Spread strawberry-clementine mixture evenly in pie crust. Pour 3/4 of the glaze over the filling and smooth. For halved strawberries, dip in remaining glaze and arrange decoratively in a circular pattern on the top. If desired, arrange halved clementines in a border.


I found the recipe in the September 2009 issue of Gourmet, which was a beautiful A to Z issue with gorgeous photos. It was also the second to last issue before they closed their doors, which was incredibly sad. There were so many recipes that I wanted to make from that issue, but I settled on this pie first because I was intrigued by a pear pie. I am extremely glad that I tried it because it is phenomenal. So similar in concept to an apple pie, but with a distinct flavor that really sets it apart and makes it unique. The original recipe called it a 'butterscotch' pear pie, but in my opinion that isn't the overwhelming flavor. After making it once, I ended up making it about 3-4 more times in the fall/winter season because it was so good and always turned out so beautifully, with a gorgeous golden crust hiding perfectly tender baked pears. I also used the Tastebook website to create a cookbook for my family for Christmas and this was one of the recipes I included.


Autumn Pear Pie

from cilantropist.blogspot.com

Double recipe of all-butter pastry dough
3 tbsp all-purpose flour
1 tsp cinnamon
½ tsp grated nutmeg
⅛ tsp salt
½ cup packed brown sugar
2½ pounds firm-ripe Bartlett and Anjou pears (about 3 ea.), peeled, cored and each cut into 6 wedges
1 tbsp fresh lemon juice
1 tsp pure vanilla extract
1 tbsp unsalted butter, cut into bits
1 large egg beaten with 1 tbsp warm water
1 tbsp granulated sugar

All-butter pastry dough
1¼ c all-purpose flour
1 stick cold unsalted butter, cut into ½-inch cubes
¼ tsp salt
5 tablespoons ice water (or less)

For pastry dough, blend together flour, butter, and salt in a bowl with your fingertips or pulse in a food processor (easiest) until most of mixture resembles coarse sand with some roughly pea-size butter lumps. Drizzle 3 tablespoons ice water evenly over mixture and or pulse until incorporated.

Squeeze a small handful: If it doesn’t hold together, add more ice water, ½ tablespoon at a time, stirring (or pulsing) until incorporated, then test again.

Turn out dough onto a lightly floured surface and work the dough with hands for a minute or two to evenly distribute butter. Press dough into a ball, then flatten into a 5-inch disk. Chill, wrapped in plastic wrap, until firm, at least 1 hour. Repeat for second portion of dough.

Preheat oven to 425°F. Whisk together flour, cinnamon, nutmeg, and salt, then whisk in brown sugar, breaking up any lumps. Gently toss pears with brown sugar mixture, lemon juice, and vanilla and let stand 5 to 15 minutes to macerate fruit.

Roll out 1 piece of dough (keep remaining disk chilled) on a lightly floured surface with a floured rolling pin into a roughly 13-inch round. Fit into a 9-inch pie plate. Roll out remaining piece of dough into a 13-inch round. Reserve scraps.

Transfer filling to shell. Dot with butter, then cover with pastry round. Trim edges, leaving a ½-inch overhang (reserve scraps). Press edges together to seal, then fold under. Lightly brush top crust with some of egg wash, then cut 3 (1-inch-long) vents.

Roll out dough scraps about ⅛ inch thick and cut out leaf shapes with cutters (or a knife). Arrange decoratively on top of pie, pressing gently to help them adhere.

Lightly brush top crust and cutouts with some of egg wash and sprinkle with granulated sugar.

Bake pie on hot baking sheet 20 minutes. Reduce oven to 375°F and bake until crust is golden and filling is bubbling, 40 to 45 minutes more. Cool to warm or room temperature, 2 to 3 hours.


Tomorrow I'll be in Scotland and I'm bringing my laptop this time. I'll probably be posting tomorrows pies from the train!

Thursday, May 27, 2010

Eating in Marrakech: Djemaa el Fna at Night

Snails!

If you're in Marrakech you have to brave the Dejemaa el Fna at night at least once (if not every night) as it provides a memorable food and cultural experience.

During the day, the Djemaa el Fna is filled--for the most part--with stands selling fresh squeezed orange juice, figs, dates, dried apricots, mint and spices. There are a scattering of women offering mehndi and a few snake charmers to entertain the tourists too.

Once the sun begins to go down the square begins to transform. Countless numbers of embellished green metal stalls are hauled into the square and assembled everywhere you look.

At night the square fills with locals and turns into a huge open air restaurant. The entire square is pitch black, lit only by the light of the full moon and endless food stalls.

Once you see it, you begin to understand why UNESCO branded this place a "masterpiece of the oral and intangible heritage of humanity". There is smoke, steam and the smell of food everywhere. Each stall tries, rather aggressively, to get you to choose them for your dinner. We spent a little time walking through, seeing what was available before settling down for dinner...

Sheep head! Mother Humble's favorite. Though we didn't partake this visit. You can see a few photos of that in a previous post here.

Eventually we settled on #12, the food looked fresh, it was very busy and the hawkers were more relaxed.

We started with a plate of olives. Sauces (tomato and spicy) to dip the ubiquitous dinner accompaniment, a round crusty bread called khobz (which I plan on baking for the blog).

Next came plates of sweet peppers, aubergine (eggplant) and wafer (fried potato (?) cake with a bit of minced lamb inside)

Meat with a side of meat and more meat. This was not a place for me to indulge my vegetarian tendencies. Mixed grilled skewers (chicken, lamb, vegetable, chicken hearts and a few others). Sausages (and meatballs apparently, found under the skewers). Mixed fish (a couple types of unidentifiable fried white fish, whole fried shrimps and strips of fried squid). Couscous with chicken and vegetables (carrots and some type of fibrous potato I'm not familiar with).

It was all very good, though the chicken skewer might have been a tad undercooked. Still, these seem to be great places to indulge in street food without having to worry about what it might do to your belly. (In fact, none of us had any belly troubles and we basically ate everything we saw in Morocco).

More food than any of us could eat. Total cost, about $20 for 4 1/2 people.

Meyer Custard–Cream, Lemon Silk Meringue & Raspberry Dream Pie


Happy Thursday all! Back blogging from London once again. Last night I went out in search of some good chicken tikka but ended up at a nice gastro-pub instead. Probably too nice, as my daughter was in a bit of a mood and I spent the entire time in terror that she would make a scene and disturb "his lordship" sitting directly behind me.

Scotch Duck Egg
Boiled duck egg, wrapped in sausage, breaded and deep fried.


One highlight of the meal was dessert. Honeycomb ice cream with shortbread and warm toffee sauce. This is simple dish I'll be recreating for the blog when I get home.


So delicious.

Certainly worth wrangling a fussy toddler for an hour.

Alright, today's pies! Leah of Wine Imbiber sent me three pies. Two of them Lemon and anyone who reads this blog faithfully knows how I feel about that gorgeous fruit. Of course, I'll not let my natural fruit biases sway me in my decision making. So Leah and her husband host Wine Imbiber and while the site isn't devoted to baking, Leah does post recipes on occasion and their appropriate wine paring.

" My husband is a wine writer, and me, well I like to drink wine. And eat and cook and bake. So, through the site we like to combine it all by giving wine recommendations that go with whatever recipe that is featured any given week. Some weeks are devoted solely to wine stories and other weeks we report on food & wine events that we attend or discoveries made while traveling."

What to know what to pair with a slice of lemon custard cream pie? Don't look at me. I have absolutely no idea. I love to cook with wine, but picking a wine that complements what I make, well that is just beyond me. That's what I need folks like Leah for.

Let's get to the pies!


First is a pie recipe that I’ve entered in contests many times in past years (prior to becoming a food blogger), but has never received even the tiniest bit of recognition. Nada. Zip. Zero. I was never surprised by this, though, as it has an ingredient that seems to rub people the wrong way (including most of my family). But oddly enough, it remains everybody’s all-time favorite pie. What’s the offensive ingredient? Tofu. That’s right. Plain ol’ simple (...dare I say, humble? Nah, that would be grounds for immediate disqualification!) soybean curd. Wait! Please don’t start scrolling to the next recipe. This really is good...delicious even! The tofu creates the creamiest of fillings that contrasts so groovily with the sandy texture of the crust that words can’t even describe the sensation! Add some whipped cream on top and you really have the makings for a party in your mouth. She ain’t the prettiest of pies, but no one seems to care after the first bite. Trust me on this one!


Raspberry Dream Pie
2 cups graham cracker crumbs (from about 2 packets of crackers)
2/3 cup pecans
1/3 cup vegetable, safflower or grape seed oil
4 cups fresh raspberries (option: substitute 2 cups with blackberries)
2 tablespoons lemon juice (from 1 lemon)
1 cup extra–firm silken tofu (one 12.3 oz box; I like MORI-NU brand)
1/2 cup brown rice syrup (I use LUNDBERG brand, available at Whole Foods)
1 teaspoon vanilla extract
Whipped cream (for optional topping)

Preheat oven to 350° F.
Process the graham cracker crumbs along with the pecans in a food processor until the nuts are about the same consistency as the cracker crumbs. Keep the processor running and slowly pour the oil (through the feed tube) into the processor bowl until the crumb–nut mixture absorbs it. Stop the processor and scrape the corners of the bowl to thoroughly mix the oil in.

Check the consistency of the mixture by squeezing a small amount of the mixture between your fingers. It should hold together like moist (not wet) sand. If it is too dry, mix in a little more oil. If it is too wet, mix in more graham cracker crumbs.

Press the mixture into a 10–inch pie dish. I use a smooth, round meat mallet to press the crumbs compactly into the bottom of the pie dish. This will prevent thick pie crust corners if done correctly. Use your fingers and thumb to press the side crust into an even thickness.

Bake the crust for 8–10 minutes (or until lightly–browned). Set it aside and leave the oven on.
Meanwhile, carefully rinse the fresh berries and set aside to dry on paper towels. Select about a cup of the nicest looking berries and reserve to garnish the top of the pie after it has baked and cooled.

Take the remaining 3 cups of berries and combine with the lemon juice in a medium bowl. Set aside.

Process the tofu, rice syrup and vanilla extract in a blender or food processor until smooth.
Scrape the tofu mixture into the bowl of berries and carefully fold in the mixture. Try not to squish the berries.
Spoon the filling into the baked crust and smooth it until the top is even.
Put the pie back into the oven and bake for another 7–10 minutes (until the filling just barely starts setting up).
Remove from the oven and the pie to cool to room temperature. Garnish the top of the pie with the reserved cup of fresh berries once it has cooled down.

Chill the pie in the fridge until serving time. Serve with a big dollop of whipped cream if desired.
Baker’s notes: You can substitute frozen berries for the 3 cups that get mixed into the filling if you come up short on fresh berries. Don’t use frozen berries for the garnish, though. I’ve also substituted golden syrup for the rice syrup with nice results. Either regular or low–fat tofu can be used. Just be sure it is extra–firm and silken for the creamiest results.


The next pie recipe conjures up memories of my first attempt at creating something other than lemonade with the fruit from our Meyer lemon tree. We had just moved into our first house (as newlyweds) and discovered that the lemons growing on our tree tasted like no other. I didn’t know what to do with them all, and at the time, food blogs didn’t exist. I had only my subscription to Sunset magazine to rely on for suggestions. Luckily, someone wrote an article with recipes dedicated to Meyers and what do ya know? This wonderful pie recipe was in it! This recipe couldn’t be easier to make (especially when using a store-bought crust). It produces a lush, creamy filling that would easily be complimented by some berries and whipped cream. It’s considered a classic around our house, so I had to include it on the blog.


Meyer Custard–Cream Pie

10 (about 2–1/3 lbs) Meyer lemons (I needed only 5)
1/3 cup cornstarch
1 cup sugar
3 large eggs
1 cup whipping cream
Baked, cooled 9–inch pastry shell (if purchasing, use a deep–dish crust)

Grate 2 teaspoons peel from lemons. With a zester or Asian shredder, make a few long, slender strands of peel from Meyer or regular lemons; set aside. Ream 1–1/3 cups juice from the lemons.
In the top of a double boiler, mix cornstarch and sugar. Stir in juice and grated peel. Fill bottom of double boiler with 1 inch water. Place pans over high heat and bring water to a simmer; adjust heat to maintain simmer. Stir until mixture is thick and shiny, 8 to 9 minutes. In a bowl, whisk eggs to blend. Whisk in about 1/2 cup lemon mixture, then return all to pan. Stir until mixture is very thick and reaches 160° F on an instant–read thermometer, about 5 minutes.

Remove top pan. Place in a bowl of ice and stir often until mixture is cool to touch, about 6 minutes.

In a bowl, beat cream with a mixer until stiff. Fold in lemon mixture, then spread evenly in pastry shell. Scatter reserved strands of peel on top. Chill, uncovered, until slightly firm to touch, about 2 hours. Serve, or wrap airtight and chill up to 1 day.


Lastly, we come to another favorite lemon pie recipe. It’s a meringue pie, but not the usual sort that first comes to mind. In fact, it is more similar in texture to what you typically get with a key lime pie. The filling isn’t cooked (only the crust and meringue are baked), so it might be wise to use pasteurized eggs if you worry about that kind of thing or if you’re serving this pie to someone in a high–risk health group. I love this pie for its contrast of textures. No whipped cream needed here. The meringue does a nice job of cutting the tartness of the lemon, so go ahead. Dig right in!


Lemon Silk Meringue Pie


1/2 cup unsalted butter, melted
1/2 cup walnuts or pecans, finely chopped
2 cups graham cracker crumbs
3/4 cup fresh lemon juice
1 teaspoon lemon extract
4 pasteurized eggs, yolks separated from whites
2 14–ounce cans sweetened condensed milk
1/4 teaspoon cream of tartar
1/2 cup sugar

Preheat oven to 375° F. Combine the butter, nuts and crumbs in a bowl and mix well. Press the mixture into a 10–inch pie plate and bake for 9–11 minutes or until lightly browned and crust has set. Remove the crust from the oven and allow it to cool completely. Don’t shut the oven off.
Combine the lemon juice, extract, 4 egg yolks and sweetened condensed milk in a medium bowl and mix well. Pour the mixture into the cooled pie crust and put in refrigerator.

Combine the 4 egg whites with the cream of tartar in a large bowl and beat with a hand held mixer until soft peaks form. Slowly add in the sugar and continue beating until stiff peaks form. Check the meringue to see that the sugar has completely dissolved by feeling it with your fingers. It should have a smooth consistency; not gritty or sandy feeling.

Spread the meringue on top of the lemon filling, making sure it seals the entire top by going to the inside edge of the crust. Make decorative swirls in the meringue with a spoon or offset spatula.

Bake the pie for 11–15 minutes or until the meringue turns golden brown. Remove from oven and allow to cool down a few minutes before placing it in the refrigerator to chill completely (about 4 or 5 hours).
Related Posts with Thumbnails